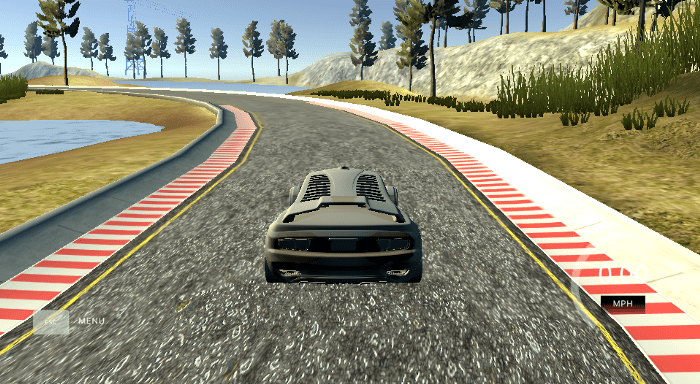
This is the third project of self-driving cars engineer nanodegree. In this project we will train a car to follow a human good driving behavior.
Behavioral Cloning Project
The goals / steps of this project are the following:
- Use the simulator to collect data of good driving behavior
- Build, a convolution neural network in Keras that predicts steering angles from images
- Train and validate the model with a training and validation set
- Test the model successfully drives around track one without leaving the road
- Summarize the results with a written report
Using the Udacity provided simulator, and my drive.py file, the car can be driven autonomously around the track by executing
python drive.py model.h5
The model.py file contains the code for training and saving the convolution neural network. The file shows the pipeline I used for training and validating the model, and it contains comments to explain how the code works.
Data Collection Tactics
I started to collecting my own data from track 1 and track 2, always following the center of the road, it was a little hard to control de car with the mouse, but it was a better approach than use the keyboard, more natural.
I drove the car in track 1 following the next rules:
- Trying to stay in the center of the road as much as possible.
- Made one lap clockwise and one counter-clockwise for better generalization.
- For some curves I tried to simulate recovery situations.
At the end, after so many tests, when I added data from track 2 the model stop working on track one. So, I decided to use only track 1 data.
Data Visualization
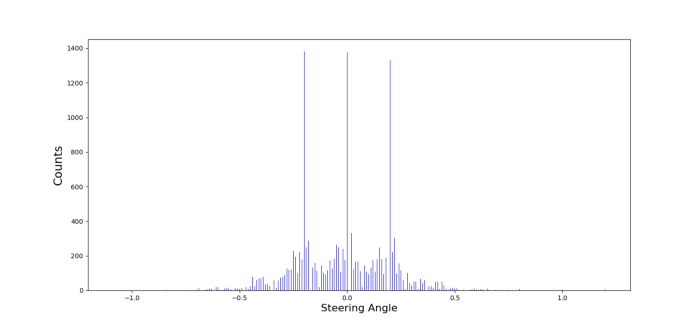
If we visualize the distribution of the dataset, we will see that most of data is centered in 0 value (the chart already has angle correction of 0.2 for left and right cameras):

From a total of 6013 lines on csv file, almost 1400 lines have a steering angle of 0. So, We have to make a data augmentation to improve data distribution.
Data Augmentation
For data augmentation, I decided to generate new images from the original ones, using random flip, random translation and random brightness strategies:
def random_flip(image, measurement):
    if np.random.rand() > 0.5:
        image = cv2.flip(image,1)
        measurement = measurement * -1.0    return image, measurement def random_translation(image, measurement, trans_range):
    rows,cols,ch = image.shape
    tr_x = trans_range*np.random.uniform()-trans_range/2
    tr_y = trans_range*np.random.uniform()-trans_range/2
    Trans_M = np.float32([[1,0,tr_x],[0,1,tr_y]])    image = cv2.warpAffine(image,Trans_M,(cols,rows))
    measurement += round(tr_x * 0.002, 2)    return image, measurementdef random_brightness(image):
    hsv = cv2.cvtColor(image, cv2.COLOR_RGB2HSV)

    random_value = np.random.rand()    if random_value > 0.5:
        ratio = 1 + random_value - 0.5
    else:
        ratio = random_value

    hsv[:,:,2] =  hsv[:,:,2] * ratio
    image = cv2.cvtColor(hsv, cv2.COLOR_HSV2RGB)    return image
Then, only for values that has less of 10% of the max counts are augmented 5 times.
max_counts = np.amax(counts)
        i, = np.where(_classes == measurement)        if counts[i]/max_counts < 0.1:
            for i in range(5):
                augmented_image, augmented_measurement = random_flip(image, measurement)
                augmented_image, augmented_measurement = random_translation(augmented_image, augmented_measurement, 5)
                augmented_image = random_brightness(augmented_image)

                add_to_augmented_data(augmented_image, augmented_measurement, augmented_images, augmented_measurements)
So, this will help to improve the dataset distribution. This process was done inside a generator, which I will explain later.
Model Architecture and Training Strategy
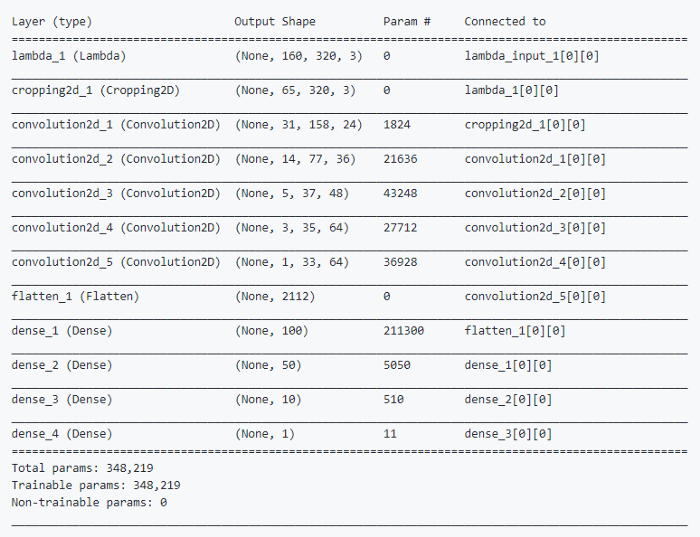
First I started to use the LeNet NN structure, but the model didn’t work as expected. So, I changed to NVIDIA network which is a more powerful NN, here is the structure:

I also cropped the images, so the car doesn’t get confused with surrounding environment. Here is the code:
model = Sequential()
model.add(Lambda(lambda x: x / 127.5 - 1.0, input_shape=(160, 320, 3)))
model.add(Cropping2D(cropping=((70,25),(0,0))))
model.add(Convolution2D(24, 5, 5, subsample=(2,2), activation='relu'))
model.add(Convolution2D(36, 5, 5, subsample=(2,2), activation='relu'))
model.add(Convolution2D(48, 5, 5, subsample=(2,2), activation='relu'))
model.add(Convolution2D(64, 3, 3, activation='relu'))
model.add(Convolution2D(64, 3, 3, activation='relu'))
model.add(Flatten())
model.add(Dense(100))
model.add(Dense(50))
model.add(Dense(10))
model.add(Dense(1))
Attempts to reduce over fitting in the model
One thing that I realized was that in training, the validation loss didn’t reflect so well the real accuracy of the model. It was more like testing in the simulator until I found the best parameters. I found that 3 epochs and a default learning rate work with the data that I collected from track 1 (The model used an adam optimizer, so the learning rate was not tuned manually).
Generators
At some point, the AWS server started to have memory issues. To solve this problem I used generators because this is much more memory-efficient.
def generator(lines, batch_size=32):

    images, measurements = get_images(lines, 'data/IMG/')
    _classes, counts = np.unique(np.array(measurements), return_counts=True)
    plot_distribution_chart(_classes, counts, "Steering Angle", "Counts", 0.002, "blue", "./images/data-distribution.png")    while 1:        for offset in range(0, len(lines), batch_size):
            batch_images = images[offset:offset+batch_size]
            batch_measurements = measurements[offset:offset+batch_size]            batch_images, batch_measurements = augment_data(batch_images, batch_measurements, _classes, counts)            X_train = np.array(batch_images)
            y_train = np.array(batch_measurements)            yield sklearn.utils.shuffle(X_train, y_train)
This generator receives the lines from the csv and then:
- It loads images.
- Plot Initial distribution chart.
- For every batch, the data is augmented.
- Finally, the features and labels are shuffled and returned.
The same generator is used for training data and validation data, which means that the initial dataset is splitted before use it in generators.
# Load images paths from csv file
lines = load_data_from_csv('data/driving_log.csv')
train_samples, validation_samples = train_test_split(lines, test_size=0.2)

# compile and train the model using the generator function
train_generator = generator(train_samples, batch_size=32)
validation_generator = generator(validation_samples, batch_size=32)
Conclusion
After soo many tests, I realized that this is the hardest project, by far, that I’ve made for Self-Driving Cars Nanodegree. Some key points are:
- How the data is collected.
- How is the data distribution.
- Although the strategy of augment only the data that has 10% of the max counts worked for track 1, the same strategy didn’t work when I tried to add data from track 2.
- At some point, trying to make a better distributed data, I started to cut some zero angle data, and it was awful for model training. I realized that is better to have a final dataset not distributed than has a perfect dataset with less data from initial data.
- Just collecting more data doesn’t mean that you will have better model. You have to think very well on the strategy that you will use.
- Generators are like magic when you don’t have infinite resources (memory).
- A small validation loss doesn’t mean that the car will always stay on track. This could be over fitting and, in this case, there is a very thin line between under fitting and over fitting.
- The speed is really important when you don’t have a computer that can process data really fast.
Future Improvements and tests.
- One idea that I had is to start first trying to complete track 2 and then go for track 1 as the last one is easier.
- Collect more data with a simulator using a game controller (really hard to do it with the mouse).
- Cropping images in a different way.
- Use YUV color space instead of RGB as NVIDIA paper suggests.
- More ways to augment data.
